Hearty Chili Mac Backpacking Recipe

Dehydrated chili mac was the first backpacking recipe I attempted on my own. And it was delicious! Better yet, it was surprisingly easier than I expected.
I’ve tweaked and edited this recipe a few times and really like this version (my first version was way too heavy on the garlic, haha!) This meal is comforting and packed with protein that keeps me full for hours.
When made with premium organic ingredients my cost per serving comes out to around $4.10. However, it’s possible to cut costs with more budget-friendly grocery swaps.
Disclaimer: This article features some affiliate links. I only endorse things I’ve personally used or that come highly recommended by trusted peers. If you purchase anything I mention using my referral links from Amazon, REI or other retailers I may receive a small commission. However, there is never extra cost to you. You can read more here. Thank you for your support.
Chili Mac Backpacking Recipe
Ingredients
- Lean Ground Beef [1 lb]
- Breadcrumbs [½ cup]
- Red Onion, diced [1]
- Garlic, minced [6 cloves]
- Beef broth [3 cups]
- Kidney Beans [16 oz can]
- Elbow or Rotini Pasta [8 oz]
- Tomato Paste [6 oz can]
- Corn Starch [1 tbsp]
- Zucchini, diced [1]
- Green onion, sliced [4 stems]
- Seasoning, to taste [about 2 tsp each]
- Onion powder
- Chili powder
- Paprika
- Cumin
- Salt
- Optional: Fresh or powdered cheese
Servings: 4
Cost per serving: $4.10
Calories per serving: 670
Macros per serving: 85g carbohydrates, 38g protein, 20g fat
I recommend getting the leanest meat you can find. Higher fat content can be harder to dehydrate and has a higher chance of going rancid.
Additionally, a smaller pasta size will dehydrate more easily. I like elbows the best, but anything will do – just make sure it does not have pokey parts, like a spaghetti noodle, which can pierce holes in your bags.
There’s a few substitutions I’ve had success with for this recipe; cannellini beans instead of kidney beans, chicken broth if I’m out of beef broth, and my first few versions of this meal did not have any zucchini – which was fine, but felt light on veggies and fiber.
Garlic and seasoning measurements in this Chili Mac backpacking recipe are suggestions, measure with your heart. 6 cloves of minced garlic is enough that you’ll know there’s garlic in the recipe 🙂 My first version had 8 and it was too much, even for a garlic lover like me.
If you’re gluten free, you can skip the bread crumbs. They’re mostly here to add calories and help the meat rehydrate more evenly.
Instructions
At home:
Mix beef and breadcrumbs together in a bowl, then place in a large non-stick pan without oil.
Add onion and garlic, and cook for 10 minutes or until onion is translucent and meat is browned with no remaining pink. As meat cooks, break up clumps so you have small, equally sized portions to dehydrate more evenly.
Next, add tomato paste, seasoning, broth and pasta and stir until mixed. Bring to a simmer and cook pasta to el dente.
NOTE: I find that subtracting one minute from the pasta’s recommended cook time for el dente works well. It remains firm enough that you can rehydrate it without it getting mushy.
In a bowl, mix 3 parts water and 1 part cornstarch. Add to pot and stir well and remove from heat.
Drain and rinse kidney beans and add to pan.
After cooling, spread Chili Mac on dehydrator trays. Add sliced green onion over top.
Dehydrate for approximately 10 hours at 145°F. Exact timing will vary depending on ambient humidity, moisture level in food, etc. Food is ready to package once it’s fully dry and not sticky or tacky.
If you’ll consume within a month, this is fine to put in a sealed ziplock bag. I recommend using a food-grade moisture absorber to keep it fresh.
You can extend storage time up to 6 months if you vacuum seal and store in the freezer.
If adding optional powdered cheese, I find it best to store this in a separate bag and combine with food at camp.
At camp:
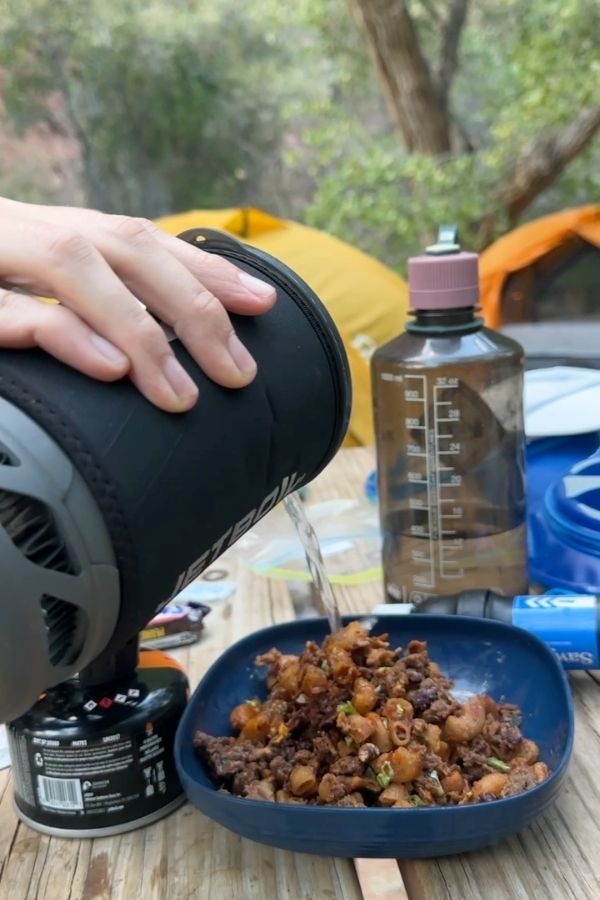
Boil 1½ to 2 cups of water. Combine dry ingredients with water in bowl, stir well then cover and let sit for 10 minutes. Enjoy!